Writing Your First E2E Test
What you'll learn
- How to start testing a new project in Cypress.
- What passing and failing tests look like.
- Testing web navigation, DOM querying, and writing assertions.
Add a test file
Assuming you've successfully installed Cypress and opened Cypress, now it's time to add your first test. We're going to do this with the Create new empty spec button.
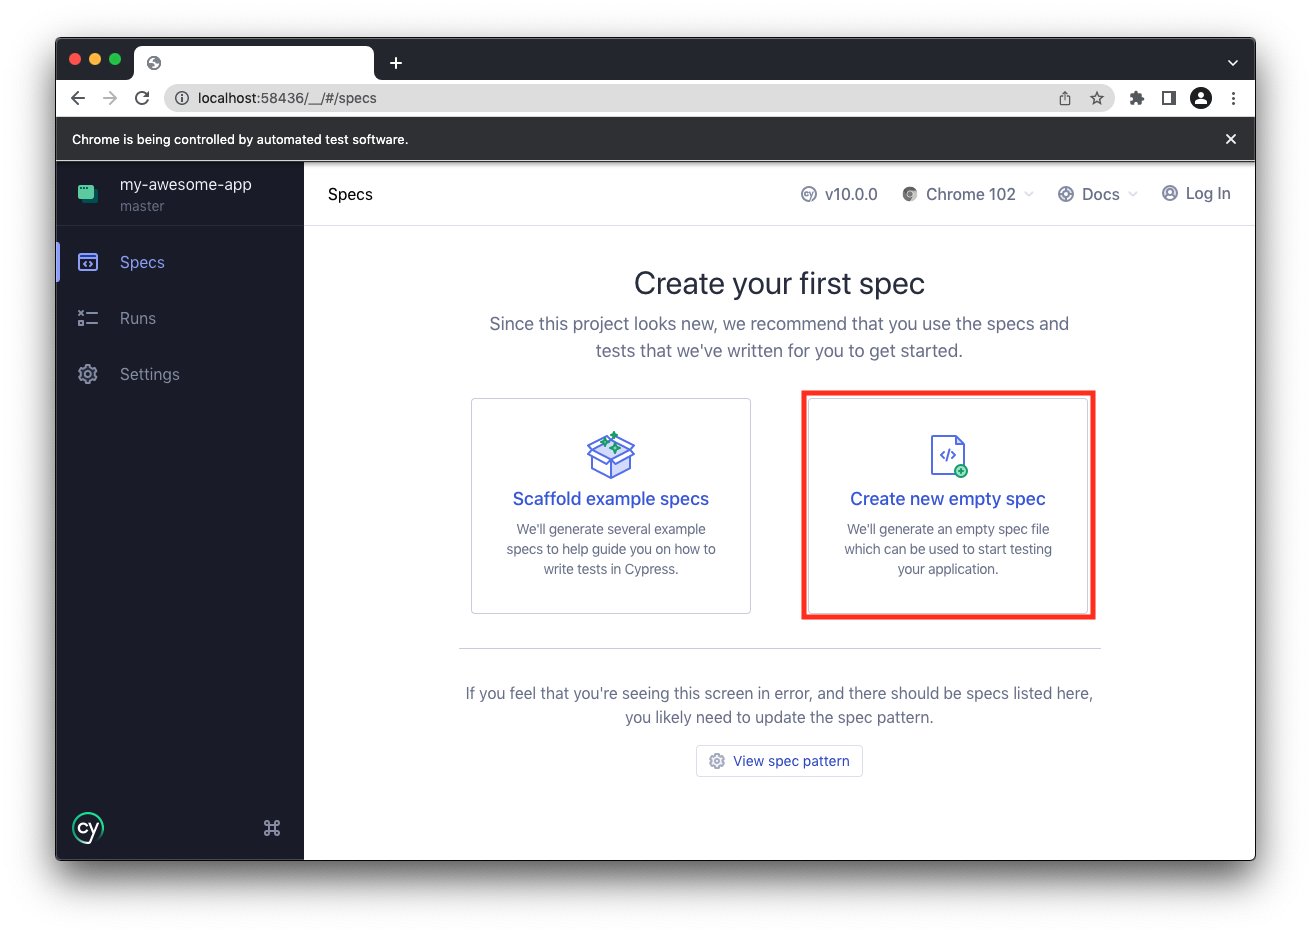
On clicking it, you should see a dialog where you can enter the name of your new spec. Just accept the default name for now.

The newly-generated spec is displayed in a confirmation dialog. Just go ahead and close it with the ✕ button.

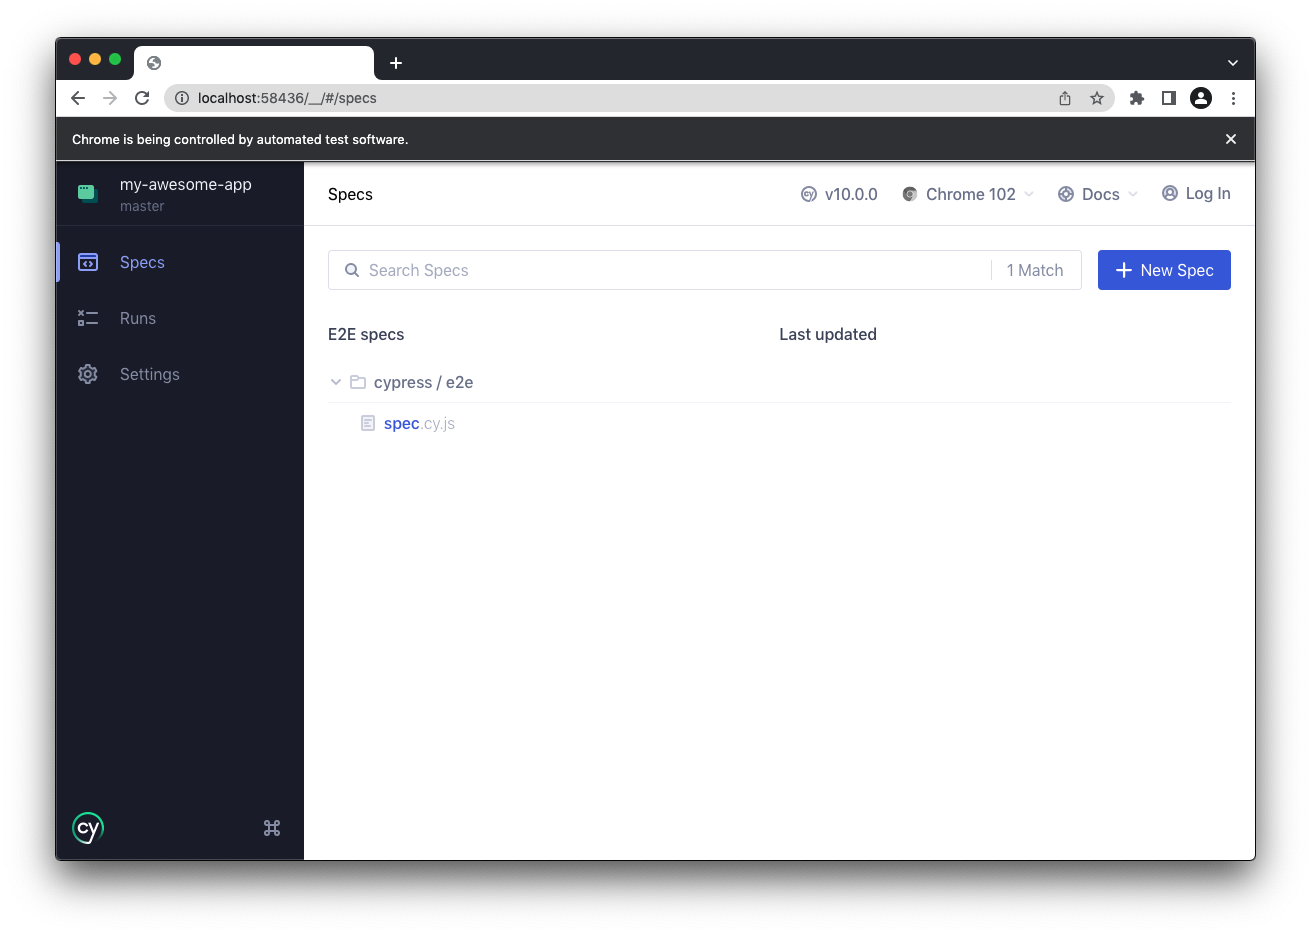
Once we've created that file, you should see it immediately displayed in the list of end-to-end specs. Cypress monitors your spec files for any changes and automatically displays any changes.
Even though we haven't written any code yet - that's okay - let's click on your new spec and watch Cypress launch it. Spoiler alert: it's probably going to FAIL. Don't worry, it's just because you haven't set up Cypress to visit a page in your app yet! Let's try something different.
Write your first test
Now it's time to write your first test. We're going to:
- Write your first passing test.
- Update it so it fails.
- Watch Cypress reload in real time.
Open up your favorite IDE and replace the contents of your spec with the code below.
describe('My First Test', () => {
  it('Does not do much!', () => {
    expect(true).to.equal(true)
  })
})
Once you save this change you should see the browser reload.
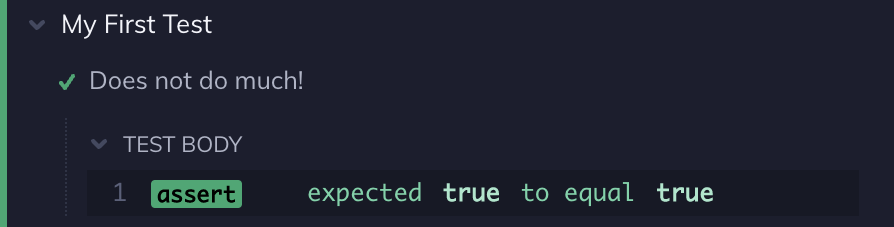
Although it doesn't do anything useful, this is our first passing test! ✅
Over in the Command Log you'll see Cypress display the suite, the test and your first assertion (which should be passing in green).
Notice Cypress displays a message about this being the default page on the righthand side. Cypress assumes you'll want to go out and visit a URL on the internet - but it can also work just fine without that.
Now let's write our first failing test.
describe('My First Test', () => {
  it('Does not do much!', () => {
    expect(true).to.equal(false)
  })
})
Once you save again, you'll see Cypress display the failing test in red since
true does not equal false.
Cypress also displays the stack trace and the code frame where the assertion failed (when available). You can click on the blue file link to open the file where the error occurred in your preferred file opener. To read more about the error's display, read about Debugging Errors.
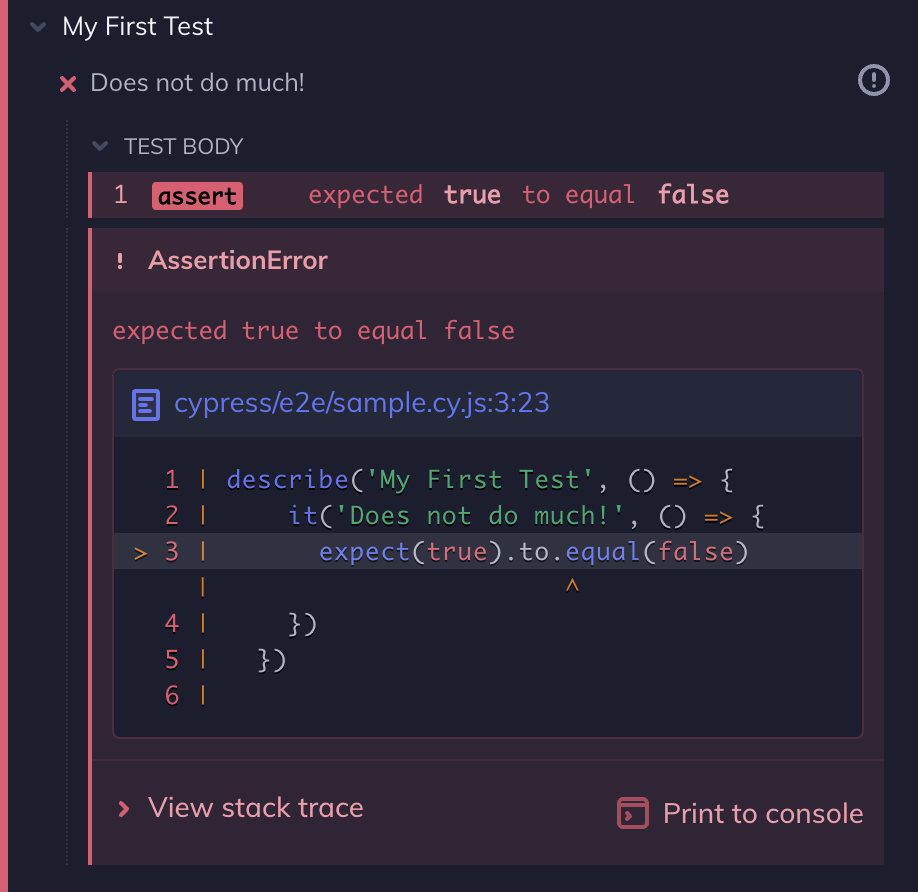
Cypress gives you a visual structure of suites, tests, and assertions. Soon you'll also see commands, page events, network requests, and more.
What are describe, it, and expect?
All of these functions come from Bundled Libraries that Cypress bakes in.
Cypress builds on these popular tools and frameworks that you hopefully already have some familiarity and knowledge of. If not, that's okay too.
Using ESlint?
Check out our Cypress ESLint plugin.
Write a real test
A solid test generally covers 3 phases:
- Set up the application state.
- Take an action.
- Make an assertion about the resulting application state.
You might also see this phrased as "Given, When, Then", or "Arrange, Act, Assert". But the idea is: First you put the application into a specific state, then you take some action in the application that causes it to change, and finally you check the resulting application state.
Today, we'll take a narrow view of these steps and map them cleanly to Cypress commands:
- Visit a web page.
- Query for an element.
- Interact with that element.
- Assert about the content on the page.
Step 1: Visit a page
First, let's visit a web page. We will visit our Kitchen Sink application in this example so that you can try Cypress out without needing to worry about finding a page to test.
We can pass the URL we want to visit to cy.visit().
Let's replace our previous test with the one below that actually visits a page:
describe('My First Test', () => {
  it('Visits the Kitchen Sink', () => {
    cy.visit('https://example.cypress.io')
  })
})
Save the file and switch back over to the Cypress Test Runner. You might notice a few things:
- The Command Log now shows
the new
VISITaction. - The Kitchen Sink application has been loaded into the App Preview pane.
- The test is green, even though we made no assertions.
- The
VISITdisplays a blue pending state until the page finishes loading.
Had this request come back with a non 2xx status code such as 404 or 500,
or if there was a JavaScript error in the application's code, the test would
have failed.
Only Test Apps You Control
Although in this guide we are testing our example application:
https://example.cypress.io - you shouldn't
test applications you don't control. Why?
- They are liable to change at any moment which will break tests.
- They may do A/B testing which makes it impossible to get consistent results.
- They may detect you are a script and block your access (Google does this).
- They may have security features enabled which prevent Cypress from working.
The point of Cypress is to be a tool you use every day to build and test your own applications.
Cypress is not a general purpose web automation tool. It is poorly suited for scripting live, production websites not under your control.
Step 2: Query for an element
Now that we've got a page loaded, we need to take some action on it. Why don't
we click a link on the page? Sounds easy enough, let's go look for one we
like... how about type?
To find this element by its contents, we'll use cy.contains().
Let's add it to our test and see what happens:
describe('My First Test', () => {
  it('finds the content "type"', () => {
    cy.visit('https://example.cypress.io')

    cy.contains('type')
  })
})
Our test should now display CONTAINS in the
Command Log and still be green.
Even without adding an assertion, we know that everything is okay! This is because many of Cypress' commands are built to fail if they don't find what they're expecting to find. This is known as a Default Assertion.
To verify this, replace type with something not on the page, like hype.
You'll notice the test goes red, but only after about 4 seconds!
Can you see what Cypress is doing under the hood? It's automatically waiting and retrying because it expects the content to eventually be found in the DOM. It doesn't immediately fail!
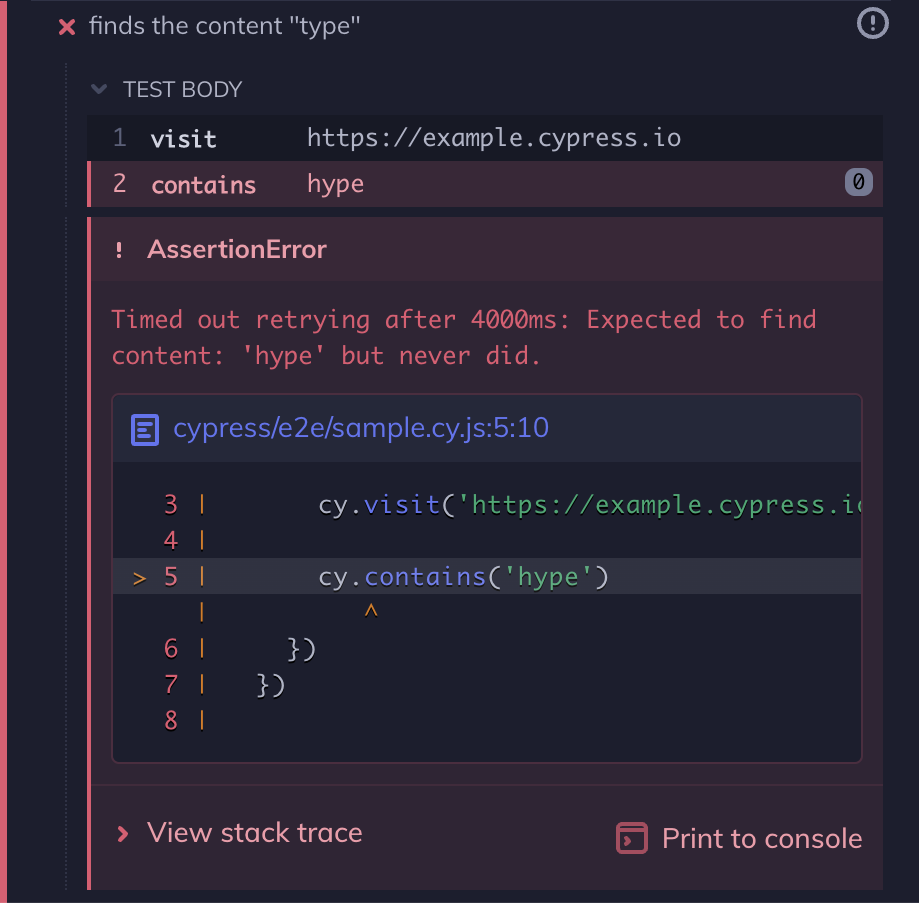
Error Messages
We've taken care at Cypress to write hundreds of custom error messages that
attempt to clearly explain what went wrong. In this case, Cypress timed out
retrying to find the content hype within the entire page. To read more about
the error's display, read about
Debugging Errors.
Before we add another command - let's get this test back to passing. Replace
hype with type.
Step 3: Click an element
Ok, now we want to click on the link we found. How do we do that? Add a .click() command to the end of the previous command, like so:
describe('My First Test', () => {
  it('clicks the link "type"', () => {
    cy.visit('https://example.cypress.io')

    cy.contains('type').click()
  })
})
You can almost read it like a little story! Cypress calls this "chaining" and we chain together commands to build tests that really express what the app does in a declarative way.
Also note that the App Preview pane has updated further after the click, following the link and showing the destination page:
Now we can assert something about this new page!
Step 4: Make an assertion
Let's make an assertion about something on the new page we clicked into. Perhaps we'd like to make sure the new URL is the expected URL. We can do that by looking up the URL and chaining an assertion to it with .should().
Here's what that looks like:
describe('My First Test', () => {
  it('clicking "type" navigates to a new url', () => {
    cy.visit('https://example.cypress.io')

    cy.contains('type').click()

    // Should be on a new URL which
    // includes '/commands/actions'
    cy.url().should('include', '/commands/actions')
  })
})
Adding more commands and assertions
We are not limited to a single interaction and assertion in a given test. In fact, many interactions in an application may require multiple steps and are likely to change your application state in more than one way.
We can continue the interactions and assertions in this test by adding another chain to interact with and verify the behavior of elements on this new page.
We can use cy.get() to select an element based on its class. Then we can use the .type() command to enter text into the selected input. Finally, we can verify that the value of the input reflects the text that was typed with another .should().
describe('My First Test', () => {
  it('Gets, types and asserts', () => {
    cy.visit('https://example.cypress.io')

    cy.contains('type').click()

    // Should be on a new URL which
    // includes '/commands/actions'
    cy.url().should('include', '/commands/actions')

    // Get an input, type into it and verify
    // that the value has been updated
    cy.get('.action-email')
      .type('fake@email.com')
      .should('have.value', 'fake@email.com')
  })
})
We normally don't suggest selecting and finding elements by their class names, but we do so here since we are querying an external site, and sometimes that is all we have to work with.
For more information on our guidance on selector best practices, see our guide on it here.
And there you have it: a short test in Cypress that visits a page, finds and clicks a link, verifies the URL and then verifies the behavior of an element on the new page. If we read it out loud, it might sound like:
- Visit:
https://example.cypress.io- Find the element with content:
type- Click on it
- Get the URL
- Assert it includes:
/commands/actions- Get the input with the
action-emailclass- Type
fake@email.cominto the input- Assert the input reflects the new value
Or in the Given, When, Then syntax:
- Given a user visits
https://example.cypress.io- When they click the link labeled
type- And they type "fake@email.com" into the
.action-emailinput- Then the URL should include
/commands/actions- And the
.action-emailinput has "fake@email.com" as its value
And hey, this is a very clean test! We didn't have to say anything about how things work, just that we'd like to verify a particular series of events and outcomes.
Page Transitions
Worth noting is that this test transitioned across two different pages.
- The initial cy.visit()
- The .click() to a new page
Cypress automatically detects things like a page transition event and will
automatically halt running commands until the next page has finished
loading.
Had the next page not finished its loading phase, Cypress would have ended the test and presented an error.
Under the hood - this means you don't have to worry about commands accidentally running against a stale page, nor do you have to worry about running commands against a partially loaded page.
We mentioned previously that Cypress waited 4 seconds before timing out
finding a DOM element - but in this case, when Cypress detects a
page transition event it automatically increases the timeout to 60 seconds
for the single PAGE LOAD event.
In other words, based on the commands and the events happening, Cypress automatically alters its expected timeouts to match web application behavior.
These various timeouts are defined in the Configuration document.
Next steps
- Learn more about the Cypress UI.
- Start testing your app.
- Set up intelligent code completion for Cypress commands and assertions.
- Record your test results to the Dashboard for advanced features like parallelization, flake detection, and more.
- Check out the Cypress Real World App (RWA) for practical demonstrations of Cypress testing practices, configuration, and strategies in a real-world project.
- Search Cypress's documentation to quickly find what you need.